“ALL-IN-ONE”
I am very excited about this new “All–In–One” grow method I’ve designed. The one thing I like the most about it is that it can fruit your mycelium using only one half-pint mycelium cake at a time. This is great for the individual grower who isn’t in this hobby just to “make a quick buck”, but for personal consumption only. Another thing that is good about this method is that you can set up as many of these “ALL IN ONE” systems as you want at the same time. That way, if you have the misfortune of getting a foreign contaminate attack in one of your domes it can only destroy the one single mycelium cake in that dome and not all of them.
The one main thing that is different with this technique from the other two fruiting methods in this computer CD grow guide is that with this technique you’ll need to use some potting soil (dirt). I highly recommend that you fill some canning jars with this potting soil and sterilize them the same way you sterilized your substrate jars. I use a potting soil I purchase at my local Ace Hardware that is sold under the name “Jungle Growth”. It is a soil that has a small amount of perlite already added to it for moisture retention but it contains no pesticides, fertilizers or fungicides. I strongly suggest that you do not purchase any potting soil sold under the name “Miracle-Grow”. This soil usually contains added fungicides, which are great if you are growing flowers or plants, but not if you are growing fungi (mycelium).
“CASING”
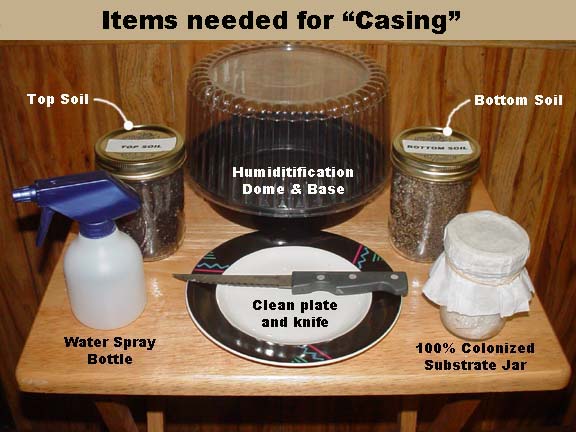
SUPPLIES NEEDED
One thing you will need for this phase of growing mushrooms will be two one-pint jars of sterile potting soil. You will need a one-pint jar (or two half-pint jars) of sterilized topsoil and another one-pint jar (or two half-pint jars) of sterilized bottom soil for each dome you are wanting to put together. Topsoil is just plain potting soil and bottom soil is a 50/50 mixture of soil and vermiculite (or perelite). To make the bottom soil you just need to take a large bowl and put two or three cups of potting soil in it along with the same amount of vermiculite or perelite. Mix it well with a large spoon and fill some glass canning jars with it so it can be sterilized. With this technique you will also need a two-piece humidification dome, a water spray bottle filled with tap water, a sharp steak knife, a clean plate and one of your 100% colonized and at least 24-hour refrigerated substrate jar. Also have on hand a bottle of rubbing alcohol and a paper towel or napkin. Begin by getting all of these items together on your table so they will be available when you need them - then wash and dry your hands.
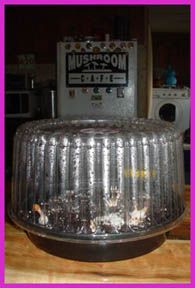
The dome I use most often, and the one you see in the previous picture is made from the top of a take-out cake pan and the base is the bottom of a restaurant take-out container. The dome tops can be found in almost every large grocery store that has a bakery section in it. You might need to purchase a cake from the store to get one of these – but it comes in handy when you have the munchies anyway. A lot of times if you just ask one of the women working in the bakery section they will give you one. The base of the dome is just the bottom part of a take-out container from a restaurant. I usually find these 1” to 1-1/2” deep black bases in Italian restaurants when I order my spaghetti or lasagna to go, but Boston Market restaurants also have similar take-out containers. You might have to look around at a few places until you find the right bases and domes that will fit together, but it really won’t be that hard.
You will begin by taking the top and bottom pieces of your dome and wiping the insides all over with a little alcohol on a paper towel (which will kill any lingering germs and contaminate spores). Now do the same thing with the surface of the plate and the knife blade. Sit these items aside for a few minutes until the alcohol evaporates and dries.
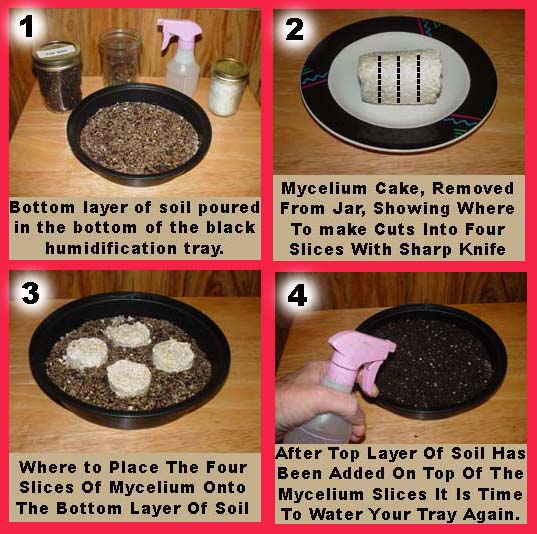
Now remove the lid from the one-pint jar of sterilized “BOTTOM SOIL” (50/50 soil/vermiculite) and pour it into the base of the dome. Spread this soil out with your hand so that it completely covers the entire bottom in an even layer. Now take your water spray bottle and spray about 10 to 15 full pumps of water, evenly distributed, on top of this first later of bottom soil.
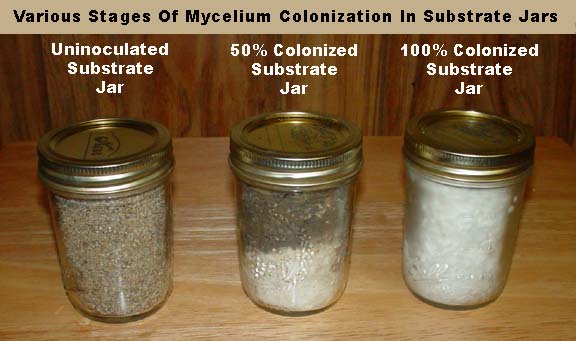
Now it is time to remove the rubber band and paper filter from the top of your colonized substrate jar. Unscrew the metal ring around the top of the jar and lift off the metal disc with the two inoculation holes in it. This flat metal disc and the paper filter can be thrown in the trash now because they won’t and can’t be used again. Turn the colonized substrate jar upside down and let the white mycelium cake slide out into your hand. If it doesn’t easily slide out you may need to thump it a few times on the hard heal of your hand to help it break it free. I usually knock the colonized mycelium cake free before I remove the lid, but that isn’t really important as long as you can get it to slide out of the jar.
Lay the mycelium cake on its side on the clean plate and cut it in half with the sharp steak knife. Now cut each of the halves into two more pieces with the same knife. What you should have now are four flat round pieces of white mycelium cake that resemble hockey pucks. You will probably notice that the mycelium has only colonized the outside of the substrate cake, but that’s common and should be expected. Place these four round pieces of mycelium cake on top of the soil in the humidity dome base as shown in the next picture.
Now remove the lid from the one-pint jar of sterilized “TOP SOIL” (just plain soil) and pour it on top of the four-mycelium discs. Spread this soil out with your hand so that it completely covers the four-mycelium pieces. Take your water spray bottle and spray another 10 to 15 full pumps of water, evenly distributed, on top of everything. Now just place the clear dome on top of the black base and the casing procedure is complete.
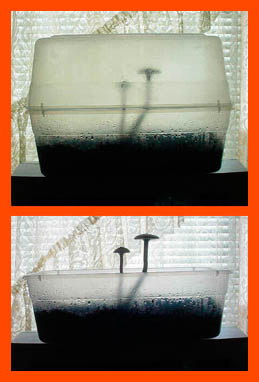
If you have a hard time locating the two parts needed to make the dome I’ve described above you can improvise quite a bit. The next picture you see is showing another way you can make a dome without the cake pan top and black base. You can go to any of the “Dollar Stores”, Wal-Mart or K-Mart and purchase two plastic storage containers. The ones I get, as shown in the next picture, are about the size of a shoebox or a loaf of bread. All you need to do is to not use the tops of these bins but instead turn one bin base upside down on top of the other one. This type of dome setup will utilize two one-pint jars of sterile bottom soil and topsoil, but it will also hold two colonized mycelium cakes (sliced into four pieces each) instead of one. You assemble and maintain this type of dome in the identical way described with the cake pan dome above.
“GROWING MUSHROOMS”
This next step is the most fun and rewarding part of the process - the actual growing and harvesting of your mushrooms. I recommend setting your completed and assembled dome on a table in front of a window so it will receive indirect sunlight for most of the day (do not allow direct sunlight). If you can’t place it in front of a window I suggest sitting it somewhere so a light will shine down from directly above it. I normally turn the light on when I get out of bed in the morning and turn it off right before I go to bed at night. You can use any type of light without getting too elaborate (You can use a 40 or 60-watt bulb in your closet). If you sit your dome in front of a window I suggest rotating your tray 90 degrees (one-quarter of a turn) once every day. This will keep your mushrooms from growing at an angle toward the light from the window. If you are using a light directly above your tray the mushrooms should grow straight toward the light and will not require any rotating of your dome.
All you need to do now is watch your mushrooms grow. After one or two days you will begin seeing humidification droplets forming on the inside of the clear dome. This is normal and is a good sign that the air within the dome is humid. I recommend lifting the dome lid once a day, gently shaking it, and letting the water droplets run off of the inside of the dome and onto the soil before replacing it back on the base. By lifting the lid once a day you are also allowing fresh oxygen into the dome while letting the carbon dioxide buildup out. Mycelium, like humans, needs fresh oxygen to survive. The dome holds enough oxygen to easily last one or two days. You will not need to actually water your soil again until after your mushrooms begin growing because the initial water you used in the beginning will remain within the dome. Within a five to seven days you should see a white mycelium growing up through the top of the soil and spreading out a little on top of the dirt. This should be expected and is a sign that your mycelium is healthy, but if you don’t see any growing it is still all right.
My observations on growing this way shows that most of the time you will begin seeing mushrooms growing on the tenth day after setting your humidification system up. They will start out as very small “pins” as they are called. When you begin seeing mushrooms growing you will need to start watering your tray once every three days using just 5 sprays (or tablespoons) of water. When you see any “surface mycelium” growing you should try to avoid spraying any water directly on it when you do water your soil. If there is so much mycelium growing on top of the soil that you can’t avoid spraying directly on it you should remove the spray top from your water bottle and pour a tablespoon or two of water from the bottle onto two or three spots of soil that has no surface mycelium growing on it. This water will be absorbed by the soil and will spread itself throughout your tray naturally.
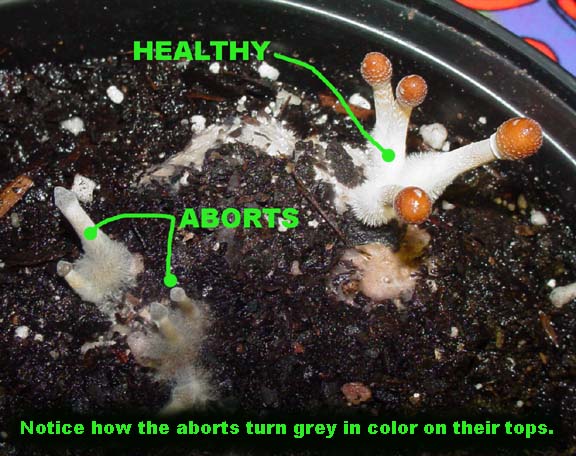
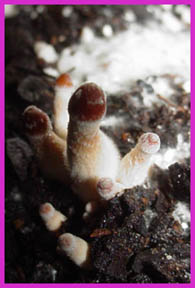
The previous picture is to let you know the difference between a good healthy mushroom and an aborted mushroom. Some of these pinning mushrooms will survive to maturity and some might not (which is natural). The ones that begin growing and then die, called “aborts”, will usually turn a gray or black color as shown in the previous picture. These aborts should not be harvested and should just be left where they are. Everyone will grow these aborted mushrooms, and there is no way not to, but they should not be considered a failure.
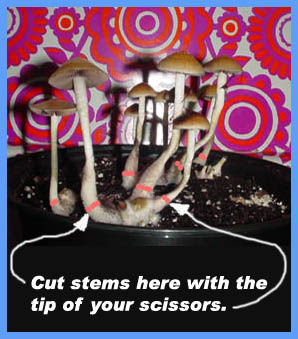
Once a mushroom has opened its cap it will not get any larger, so waiting for your mushrooms to get bigger at this point is a waste of time. When the mushrooms caps have opened and are beginning to flatten out somewhat it is time to harvest them. To do this all you need to do is take a pair of scissors and cut the stem off about ½” above the soil line (see next picture).
Once the mushrooms have been harvested you can do one of two things with them. You can either use them fresh or you can dry them for use at a later time. If you decide not to dry your mushrooms, but you also don’t want to immediately use them, you can place them in an “open bowl” (no cover or lid) in your refrigerator where they will remain fresh for about 10 more days. If you place a lid on the bowl of mushrooms in your refrigerator they will be ruined (by rotting) within 48 hours.
A lot of people have sent me emails asking me the easiest proper way to dry their mushroom harvest, so I thought I would include this extra information for your interest.
To dry your mushrooms the easiest and most economical way you should take a brown paper grocery store type bag and lay your fresh picked mushrooms in a single layer in the bottom of it. Fold the bag closed and fasten it with a paperclip, staple or tape to keep it from opening back up. Now just sit this bag in an out of the way place (your closet?) for five days.
When you open the bag up after the five-day waiting period you should have some nice dried crisp mushrooms to store away. If the mushrooms are not “crisp as a cracker” you should close the bag back up and sit it away for another day or two until they are “COMPLETELY DRIED”.
Once your mushrooms are totally dried they can be stored in an airtight container (not a baggie) in a dark place where they will last for several years. I store my dried mushrooms in glass jars with a screw on lid similar to the one I colonized my mycelium in.
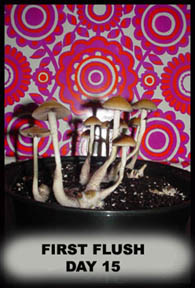
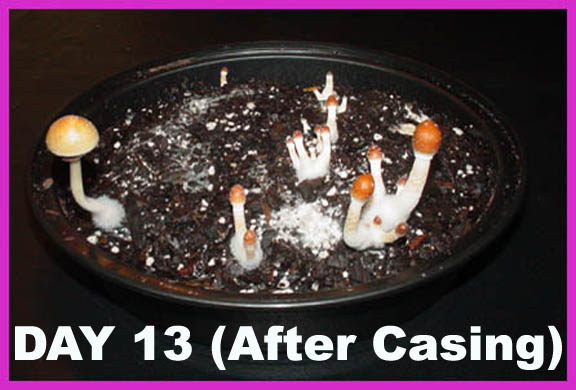
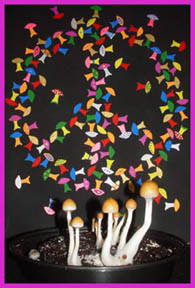
Below are some pictures I took using this “ALL IN ONE” technique:
ADVANCE to Chapter 6: BUBBLE OR NOTHING TECHNIQUE |