This next section of my grow guide will cover the actual inoculation, or adding of your mushroom spores, into your sterilized substrate jars. If you have already filled and sterilized your substrate jars, as discussed in the previous chapter, it is now time to add the mushroom spores so the mycelium can grow and colonize them.
This chapter is divided into two sections. The first section is how to inoculate your substrate jars using a spore syringe and the second section will cover how to inoculate using a spore print. I personally find using a spore syringe the easiest and most sterile way to accomplish this task, but spore prints will work just as well.
“INNOCULATION WITH A SPORE SYRINGE”
If you have a spore print you can drop down to the next section, but I think most people should go ahead and read both sections anyway if for nothing more than basic knowledge. Most spore syringes are purchased as 10cc syringes, but some suppliers sell 12cc syringes (both will work).
The best way to use one of these spore syringes is to also have on hand your one-dozen (12) sterilized substrate sitting on the table in front of you. You will also need 12 paper coffee pot filters, 12 rubber bands, a nail and a small hammer. The nail you will be using should be slightly larger than the syringe needle because you will be injecting spore solution through the hole it makes.
To begin with you will need to place the needle on the syringe if it isn’t already attached. Now slowly draw the plunger of the syringe back a little bit to allow some air to enter the chamber of the syringe (be careful not to pull it back so far that it comes out). Now you should shake the syringe for a couple minutes to agitate the solution and break up any spore clusters that might have formed during shipping or storage.
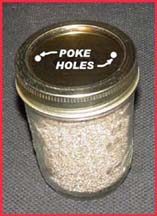
The next step is to sit one of the sterilized jars in front of you and poke two holes in the lid using your nail and hammer (See illustration).
 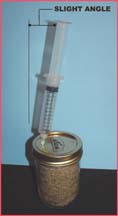
Once you have the two holes poked into the substrate jar lid it is time to inject some spore solution from the spore syringe into the jar. Insert the syringe needle all the way into one of the holes in the lid at an angle so that the needle penetrates the substrate mix and touches the glass side of the jar. (See illustration). Now slowly push the plunger of the syringe in, while reading the scale on the side of the syringe body, until you have injected one-half of a cc into the substrate jar. As you do this you should see the spore solution run down the inside surface of the glass jar. Once you have injected the solution into one side of the substrate jar its time to do the same thing in the other hole you poked into the jar’s lid. Just pull the needle out of the hole you just had the needle in and stick it into the other hole in the lid making sure that the syringe is at an angle where this second injection (one-half of a cc) will also inject the spore solution between the substrate mix and the inside on the glass.
Hopefully you have now successfully inoculated your first jar. The next step is to take one of the paper coffee filters and lie it on top of the jar’s lid that you just inoculated with your spore syringe. Secondly you should take one of the rubber bands you have and use it to hold the paper filter in place. Now all you need to do is take an ink pen and write the date and the strain of spores you used on the top of the paper filter. This will help you keep track of your progress as the days and weeks pass by.
All you need to do now is set the second sterilized jar in front of you on the table and poke the two holes in the metal lid the same way you did your first jar. Continue poking, inoculating and paper filter covering your substrate jars until your spore syringe is empty. A 10cc spore syringe will easily inoculate 10 substrate jars and a 12cc spore syringe will contain enough solution to inoculate a full dozen (12) jars.
I hear a lot of people talk about spraying a bleach/water solution in the air before they begin this jar inoculation, but I’ve found it a waste of time and effort. I also do not alcohol wipe or flame my spore syringe needle before, during or after each inoculation.
“INOCULATION WITH A SPORE PRINT”
Now I will discuss inoculating your substrate jars using a spore print instead of a spore syringe. Most spore prints I’ve seen come on a folded index card or piece of paper with Scotch Tape around three sides (which keep the spores contained inside). The best way to use one of these spore prints is to also have on hand a pair of scissors, a small pointed knife and your one-dozen (12) pre-sterilized substrate jars sitting on the table in front of you. You will also need to have 12 paper coffee pot filters, 12 rubber bands, a nail and a small hammer. The next step is to sit one of the sterilized jars in front of you and poke two holes in the lid using your nail and hammer (See illustration). Once you have the two holes poked into the substrate jar lid it is now time to add some spores to the jar.
I will give this one bit of advice before we begin. When inoculating with a spore syringe the lid is never removed from the substrate jar, but for a spore print inoculation it must be removed for a short period of time. I highly recommend that you tie a piece of cloth around your face, which will cover your mouth and nose (similar to a doctor’s mask). Also you can just pull your shirt up over your nose and mouth to accomplish the same task. What we are trying to prevent is your breathing germs or contaminates directly into the substrate jar while the lid is removed. Since the lid is only removed from the jar for about 30 seconds, I just hold my breath and don’t cover my mouth and nose, but some people (especially cigarette smokers) have a hard time doing that. About the best advice here is for you to turn your face away from the work area if you must exhale and inhale even if your mouth and nose is covered.
Using the scissors, you should now trim about one-quarter of an inch from your spore print card on the three taped sides. This will allow the card to be unfolded so you can get to the spores inside it. Using slow movements with your hands, to avoid causing strong air currents, you should now unscrew the metal ring part of the substrate jar’s lid and lay it aside. Slowly lift off the flat disc part of the lid, with the two holes in it, and place it upside down on the table. Now take folded spore print card in one of your hands and pick up the pointed knife with your other hand. Unfold the spore print card to expose the spores inside and hold it at an angle over the open jar. Now, using the point of the knife blade, you should scrape a small amount of spores from the spore print into the substrate jar. How many spores you scrape into the jar is totally up to you, but if you can visually see any spores drop from the card, that is enough. I normally scrape an area of the spore print about the size of a match head. Spores are microscopic in size, so if you see any drop in your jar, you have already added thousands of spores with that inoculation.
Once you have scraped the spores into your first jar it is time to replace the lid. Place the spore print card and knife back on the table and pick up the flat metal disc part of the lid. Turn the disc back over and lay it back on top of the inoculated jar (gasket side down). Now screw the metal ring down to hold the flat disc in place. The next step is to take one of the paper coffee filters and lie it on top of the jar’s lid that you just inoculated with your spore print.
Secondly, you should take one of the rubber bands you have and use it to hold the paper filter in place. Now all you need to do is take an ink pen and write the date and the strain of spores you used on the top of the paper filter. This will help you keep track of your progress as the days and weeks pass by.
All you need to do now is set the second sterilized jar in front of you on the table and poke the two holes in the metal lid the same way you did your first jar. Continue poking, inoculating and paper filter covering your substrate jars until they have all been inoculated with spores.
“THE WAITING GAME BEGINS”
Once you have inoculated all of your substrate jars, either with a spore syringe or a spore print, your next step is just having patience. I put all of my inoculated jars in a cardboard box and fold the lid closed to keep all light out. About the best place to put this cardboard box is on the top shelf of a closet somewhere in your home so the spores can germinate. You won’t really need to worry about the temperature of the box. As long as the temperature in your home is comfortable for you (between 65 and 85 degrees) it will be all right for your box of inoculated substrate jars. As a matter of fact, the jars will be slightly warmer than the temperature in your home because mycelium actually generates a small amount of heat as it grows. Plus the fact that since hot air is lighter than cool air it will rise and be slightly warmer on the top shelf of a closet than it will be on a lower shelf or on the floor.
I would recommend not even looking inside the box, to check on the progress of your jars, until at least 14 days after you inoculated them. The first signs of mycelium growth usually begin appearing 7 to 10 days after inoculation. It will begin showing up as a white “mold” in the areas where you injected or dropped the spores into the jars. It takes 4 to 6 weeks for the mycelium to completely colonize the substrate jar where everything is white with mycelium and you can’t see any substrate mix. This is where the patience comes in. If, during this waiting period, you see any green mold growing in the jars I would advise you to remove this jar from your cardboard box and dump the contents out. These “contaminated” jars can be washed out and reused the next time you are ready to make up some new substrate jars for another crop. While you are waiting for your jars to completely colonize with mycelium it would be a good time to read up on the various fruiting techniques in this guide and chose the one that you like best. Then you can go out and purchase the supplies you will need in the next step.
Once you see that one or more of your inoculated substrate jars have colonized 100% with white mycelium, they can be placed in your refrigerator where they will “go to sleep” and stop growing. This is very handy because it will allow your other jars to continue growing and catch up. You may also find that you may have more colonized jars than you can case (or fruit) at one time. This refrigeration of your colonized jars will place them in a suspended animation until you have the time case them. A refrigerated substrate jar can last at least three months, and sometimes up to six months, in your refrigerator without doing any harm to it.
ADVANCE to Chapter 5: INNOCULATION OF SPORES |