SHROOM WIZARD'S GROW GUIDE VERSION 4.0
MIXING & STERILIZING SUBSTRATE JARS
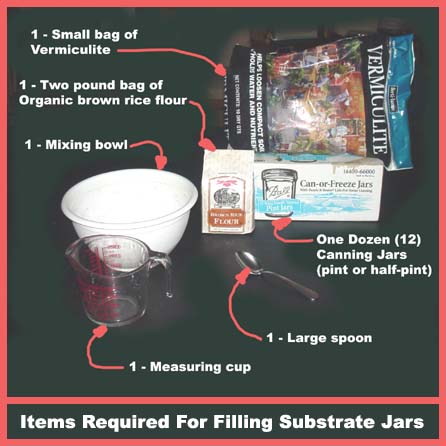
“STEP-ONE: PREPERATION OF SUBSTRATE JARS” The first thing you will need to do to begin with is to go out and purchase a few necessary items. The main things you will want to get first are 12 half-pint canning jars which cost about $7 to $10 per dozen. If you can only find one-pint jars you can go ahead and buy these, but half-pint jars are my preference. These jars must say “wide mouth” on the package or they won’t work. I’ve found these jars being sold in both grocery and hardware stores; so locating some shouldn’t be much of a problem. If you can’t seem to find any just ask an employee in the store where they might be located. If the store doesn’t carry them, you can always ask if they will order you some. They usually do because they hate to turn down a profit. If you have the money to spare, and you can find these jars in stock somewhere, I’d recommend purchasing an extra dozen jars just to be safe. Most stores that sell these canning jars don’t put them out on the shelves during winter months so they can place winter related items on the shelf in their place. So, if you are trying to find any canning jars during the winter, just ask a store employee if they have any canning jars in the back stock room. Better yet – get out your yellow pages and make a few phone calls from your home first (which saves you both time and gas).
“MIXING THE SUBSTRATE” The next step in this process you will need to do is the mixing up of the substrate ingredients and spooning it into your glass jars. This is very easy and only takes about 20 or 30 minutes. You will need to set out on the counter a large mixing bowl, a large spoon and a measuring cup. If you have a 4-cup measuring cup it will make things quicker and easier, but it’s not that important as long as it is a measuring cup.
“STEP-TWO: STERILIZATION OF SUBSTRATE JARS” This next step is the actual sterilization of these filled jars. Understand that there are contaminate spores everywhere around you. There are literally billions of them floating in the air all around you right now whereever you are sitting. If any of these spores, called “foreign contaminate spores”, end up inside your substrate jars, they will grow into a mold that can destroy your mycelium. I can guarantee you that your jars are very contaminated at this point. When you were mixing up your substrate mix, and spooning it into your jars, you probably added a million or more contaminate spores to your jars as well. I can guarantee that if you took your filled jars right now and set them somewhere for 10 days they would all be full of green mold. The next thing we need to do with these jars is to kill and destroy every one of these contaminate spores inside them (so they won’t grow into mold). This is called “Sterilizing Your Substrate Jars”. Having a pressure cooker to sterilize your jars is nice, but if you don’t have one it’s still all right. If you have a pressure cooker you can skip this part of the grow guide and move on to “Step 2-B” of this charter, but if you don’t have one, this portion (Step 2-A) of the sterilization process is for you. “STEP 2-A” – Taking into consideration that you already have your 12 half-pint (or one-pint) canning jars filled with substrate mix, your next step is to destroy anything inside those jars that might be living or cause anything to spring forth life (like contaminate spores). This is accomplished by sterilizing, or destroying, them with heat and pressure. Now just take your filled substrate jars one at a time, making sure the lids are screwed on tight, and sit them upright on the washcloth in the bottom of large pot. Keep placing these substrate jars in the pot one at a time until they form a close fitting layer of jars standing on the bottom. You don’t want your jars where they can fall over during the sterilizing process, but you also don’t want them wedged tightly against each other either. If you have space left over in the pot where your substrate jars could possibly fall over on their side you can fill this empty space with a drinking glass or two (made of glass) full of water. Now turn the stoves burner on high under this pot until the water in it begins to boil around your substrate jars. Reduce the heat on the burner to low or medium and place the lid on the pot. Look at the time on your clock or set a timer to one and a half hours. You want the water to slowly boil - not a rapid boil. You may need to adjust the burner heat a couple times to get it just right. During this one and a half hour of slow boiling you should never remove the lid from the pot. When the slow-boil time is up you can remove the pot from the stove – but don’t open the lid quite yet. I recommend waiting until the pot is warm to the touch (where it won’t burn your hand) before removing the lid. “STEP 2-B” – I must warn you that pressure cookers can be very dangerous if not properly used. There is a pressure buildup within the cooker that can cause it to possibly explode if the proper precautions are not taken. If you have access to a pressure cooker but do not have the instructions that came with it, or if you’ve never used one before, I highly suggest that you get out a large pot with a lid and turn back to “STEP 2-A”. If you have a gasket, and it seems in good condition, the next thing you will need to do is make sure you have the factory-supplied weight that sits on top of the lid. Last but not least, you should have the round rack that sits on the inside bottom of the cooker. This rack keeps your jars from sitting directly on the bottom of the cooker. If you don’t have the rack you can easily just replace it with a washcloth. To begin this process you will need to put between 2” and 3” of water in the bottom of the pressure cooker with one-tablespoon of vinegar (any type). Now put the bottom rack (or washcloth) in the pot with the water/vinegar mixture. Now, making sure that the lids on your substrate jars are screwed on tight, you can begin sitting them one at a time with lids facing up in the bottom of the pressure cooker on top of the rack (or washcloth). You want the substrate jars to fit loosely in the pot where they are not tightly packed, but you also don’t want so much space between them that they can tip over during the sterilization process. If your pressure cooker is deep enough you can put a second layer of jars sitting on top of the first layer. Once you have all of your jars sitting inside the cooker it is time to place the lid on. You need to do a couple things here to make sure everything is safe to proceed. There is a hollow stem that protrudes about one-inch out of the pressure cookers lid. Hold the lid up to a light and look through this hollow stem to make sure it is not clogged. If it is, just take something narrow (like a toothpick) and push it through the stem to clear out any blockage. Now you should just place the lid on top and lock it in place. Some pressure cookers have a twist-on lid that locks it to the pot and some have screw down clamps. Whichever type you have – please be sure that the lid is locked down tight. I discussed earlier about having the factory-supplied weight that came with your pressure cooker. This weight sits on top of the hollow stem protruding out of the lid. It is important that you sit this weight aside and do not place it on the lid it yet. It is now time to turn the stove burner under your pressure cooker on high. Check on your pressure cooker every few minutes to make sure there are no problems. What you are looking for is a steady stream of hot steam escaping through the hollow stem on the lid. In the early stages the steam will start coming out in short bursts, or puffs, but what you are wanting is a steady stream of it. Once you have this happening it is time to set the weight on top of the hollow stem that the steam is shooting out of. CAUTION: Steam can and will burn you. Please use caution sitting this weight in place so that no steam touches your hand. It will take several minutes after placing the weight on the lid for pressure to build up in your cooker, but when it does reach 15 pounds per square inch (15 psi) the weight will begin dancing and jiggling around on the stem which make an intermittent hissing sound. It is at this time that you turn your stoves burner to medium and check your clock. You want this 15-pounds pressure to remain steady for one-hour. If the pressure drops slightly during this one-hour period it will be all right as long as it does not drop below 10 pounds. When the one-hour waiting period is up it is time to turn the burner under the cooker off. CAUTION: Do not remove the lid or the weight yet. While the pot is under pressure the lid should never be loosened or removed and the weight “must” stay in place. If you remove the lid or the weight now your pot could explode and every one of your jars will break. All you can do now is wait. The pot must cool down enough that it will not burn your hands when you touch it. Some pressure cookers have gauges on their lids that show internal pressure. This gauge if you have one must read “zero” before trying to remove the weight or the lid. Some pressure cookers also have a “pop-up” valve on the lid that pops up when there is pressure in the cooker and then it drops back down when there is no pressure (my cooker has both the valve and the gauge). Once you are certain there is no pressure in your cooker it is safe to remove the lid. Please be careful because things inside the cooker could still be very hot and some hot water droplets will be on the underside of the lid that could burn your hands or feet if allowed to drip on them. Just use common sense here. With the lid safely removed, and set aside, you can now begin removing the jars one at a time and drying them off with a towel. If any of the lids vibrated loose during the cooking process they should be screwed back on tight. You should now have sterilized substrate jars that are ready for inoculation. “THREE EXTRA POINTS OF INTEREST” 1.) I have included in this grow guide three different ways you can grow mushrooms using these sterilized and colonized substrate jars. One of the three techniques is called the “ALL-IN-ONE” method. This method requires growing your mushrooms in soil. If you chose to use this method, and you should even if you chose one of the other two methods, I highly recommend you follow this next step. 2.) Another thing you should know is that your substrate jars, once they have been properly sterilized, will last for many years before you need to inoculate them with spores. When I sterilize my substrate jars I make a whole day job of it and sterilize several dozen jars throughout the day. This way I might not need to sterilize any more jars for several months if I want to continue growing mushrooms on a regular basis. 3.) Once you are finished sterilizing your substrate jars you should always let them sit for at least three or four days before you actually begin to inoculate them with mushroom spores. By doing this you will be able to inspect your jars closely to see if any green or black contaminate molds are growing in them. If you don’t see any contaminates growing in your jars it is a fairly good sign that the sterilization process was a success. It would be a shame to inoculate your jars and then find out that they weren’t completely sterile. Mushroom spores are too precious to waste. If you do see contaminates growing in your jars you can dump the contents out, wash the jars and use them the next time you make up new jars. |