“LEAPING LIZARD”
This cultivation technique requires the addition of one unique piece of equipment that the “BUBBLE OR NOTHING” technique doesn’t have, but its well worth it. Using this technique you will be able to fruit four colonized mycelium cakes at the same time instead of six, but I prefer this method to all others I’ve tried.
What you will need to do before you begin setting everything up for growing mushrooms with this method is to have on hand *four fully (100%) colonized mycelium cakes. Since it takes four to five weeks for substrate jars to fully colonize after the spores have been inoculated, you should have plenty of time to get the items together and be ready for the fruiting stage.
“SETTING EVERYTHING UP” 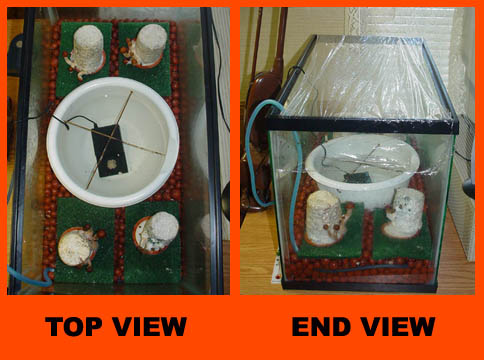
“OVERVIEW OF SETUP”
The first thing you must do is to make sure that you have everything ready and on hand that you will need. Below is a list of the nine things you will need to get.
1.) A 10-gallon glass fish aquarium (no lid necessary)
2.) Enough fish aquarium gravel to make a 3” deep layer of it in the tank.
3.) A fish tank air pump (get an inexpensive one).
4.) Six-feet of air pump tubing (Cut into two three foot sections).
5.) A fish tank bubbler stone (small or large doesn’t matter).
6.) Four flat green pot and pan scouring pads (about 4” by 6” each).
7.) One small roll of plastic wrap (Saran Wrap).
8.) One medium size plastic bowl (about 6” to 10” wide & 4” to 6” deep)
9.) One ultrasonic fogger (explained below).
I will begin this technique by explaining to you what an “Ultrasonic Fogger” is and how to obtain one. An ultrasonic fogger is something sold in most pet supply stores like Petsmart or in stores that sell supplies for reptiles like snakes, frogs and lizards. They are little electronic devices that you place in a lizard’s (or reptile) water dish, plug it in the wall, and it produces a cool mist fog inside their tank. I have a friend who purchased one for his lizard tank and when I saw it in operation it rang a bell in my head. I thought, “This would be excellent for raising the humidity in a mushroom fruiting setup”. My next step was to locate one.
I visited a pet store and found they were charging $45.00 for one. I thought that was a bit too much money, so I checked another pet supply store. They had one for $40.00, but I still thought that was too much to pay. Now that I’ve seen what they do for growing mushrooms I think they are worth every penny of it.
What I finally ended up doing was visit eBay to check if they had foggers for sale. I ended up purchasing one there for $9.95 (plus a $6.00 shipping fee). I’m not saying that you can still get one for that price, but there is one person always selling remote controlled ones there for $16.99 plus $9.00 shipping. If you want to check them out just click the following link “FOGGER” while your computer is online (or go to ebay.com and type the words REMOTE POND FOGGER in their search box in the upper right corner of your screen. You can even check out a Spencer Gifts Store if you have one in a mall near you. I hear they sell them there for a good price. Spencer Gifts sells them to make fog for Halloween decorations (but they sell them all year round and not just at Halloween). I think you will love this little gadget.
Once you have gathered together everything you will need, the next step is to set the entire fruiting system up. To begin with, you should use a little rubbing alcohol and a paper towel to clean the inside surface of the glass aquarium. Then you should set this cleaned aquarium in the place where you will want to grow your mushrooms. I sit mine on a table in front of a window so light will be able to shine on it. You don’t want direct sunlight though, because it can possibly overheat the aquarium. If the sun shines directly in through the window you will be using you will probably need to keep the blinds closed. A lot of light still gets through closed blinds – just not direct light (plus you don’t want people outside admiring your crop from outside anyway).
Now you should place your air pump beside your aquarium, attach the end from one of the three-foot air tubing pieces to it and attach your bubbler to the other end. There is one thing I want to add pertaining to the bubbler you will be using. There are a large variety of bubblers available. Some are nothing more than little porous stones and some are long flexible bubblers. If you can afford one of the longer flexible bubblers (12 to 18 inches) I would suggest getting one of these, but if you can’t, the smaller bubble stones will work fine. With the air hose now attached you should lay the bubbler on the center bottom of your aquarium. If you are using a longer flexible bubbler you should bend it into a circle or oval and lay it on the bottom center of the tank.
The next addition will be the adding of the fish tank gravel. I prefer using the white gravel because it doesn’t contain any dyes or colorings. If it is easier, or a little less costly, you can substitute the aquarium gravel for just about any gravel as long as the pieces of stone are no larger than the size of a marble. Whatever type of gravel you will be using should first be washed and rinsed to rid it of any sand, dust or dirt particles on it. All you need to do for this is put your gravel in a bucket, fill it with water and then strain out the water. After doing this two or three times should be sufficient enough to clean it. Once the gravel has been washed you can now add it to your aquarium on top of the bubbler. The bottoms of most aquariums are glass - so add the gravel slowly being careful not to break it. Now spread the gravel out with your hand to form an even flat layer across the bottom of your setup.
Now take the medium size plastic bowl, fill it almost to the top with water, and sit it in the center of your aquarium. Holding the top rim of the bowl with both hands, gently twist and wiggle it back and forth while pushing down on it. What you want to do is sink this bowl into the gravel until it sits on the bottom of the tank with the gravel up around the sides. If the bowl sits on top of the bubbler it’s all right, but I just place the bubbler a little off center to accommodate for the bowl.
The next step in this process is to add some water to your tank. Begin by pouring water over the gravel until it is about ¼” to ½” below the top of the gravel (plain tap water is fine for doing this). The reason I had you fill the bowl with water before you placed it into the tank was to prevent it from floating like a boat when you added water to the gravel around it. You can now plug your air pump in to make sure everything is working correctly up to this point. You should be able to see and hear air bubbles rising to the surface of the water and breaking. You can now unplug your air pump until everything is completed.
Now it’s time to add the ultrasonic humidifier to the setup. These units come in various sizes, but they are all small. Please read the instructions that came with your ultrasonic fogger so you will understand it’s operation and how much water they recommend placing in the bowl (normally three to four inches). Place the unit in the center of the bowl of water that is sunken into the gravel in the middle of your aquarium setup. Let the electrical cord go up and over the side of the aquarium so that it hangs on the outside of the tank. Now you can plug the fogging unit into an electrical socket to make sure that it works properly. If it is working correctly you can unplug it for now.
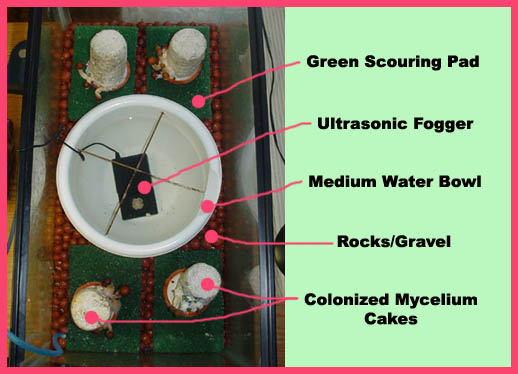
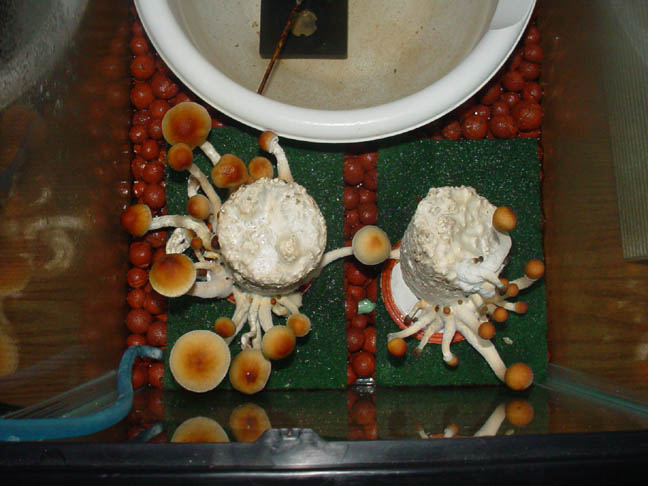
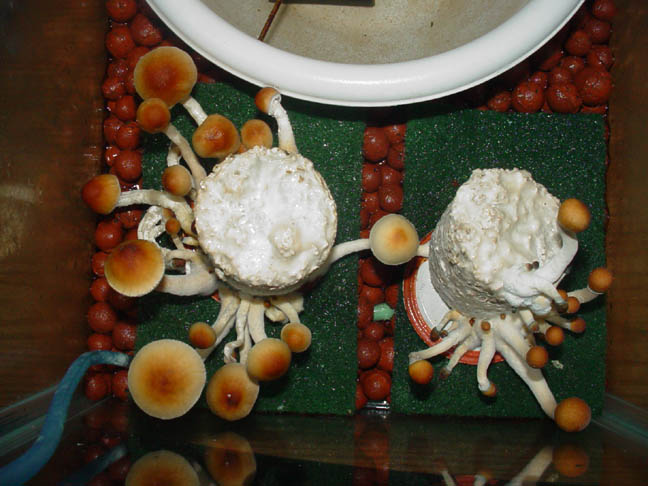
The next thing you will need to do is get your four green scouring pads ready. These scouring pads are sold in almost all grocery stores and can be found in the same area where dish liquid is being kept on the shelf. They are a dark green color and measure about 4” by 6” and about ¼” thick. You will normally find them in packs of 2 or 4 each. Just sit these four pads on top of the gravel in your tank and make sure they are level and flat (see picture).
Well, your “LEAPING LIZARD” setup is almost complete at this stage and all that is missing are your four *or less 100% colonized half-pint substrate cakes. Assuming you have the colonized cakes ready to place in the aquarium you should take the first substrate jar, turn it upside down and thump it against the hard heal of your hand one or two times. This should break the colonized cake free where it will slide back and forth inside the jar. Now remove the screw off metal ring part of the lid and sit it aside. Remove the flat disc part of the lid and lay it upside down (gasket facing up) in the center of the first green scrubbing pad in your aquarium. Slowly turn your substrate jar over so that the mycelium cake will slide out and sit in the center of the lid you just placed on the scrubbing pad. Your mycelium cake should now be sitting upside down and will need to be turned over so it will be sitting upright again like it was when it was colonizing in the jar. The reason it needs flipped over is because the bottom of your mycelium cake is flat (where it formed at the base of the jar) and the top usually isn’t. By flipping the cake over it will be able to stand straight up on the lid instead of sitting at an angle. Making sure your hands are clean, just take your thumb and index finger, pick the cake up, flip it over and sit it back down in the center of the inverted lid. Continue doing these same steps with each colonized jar until you have all four mycelium cakes sitting on the four lids that are centered on the four green scrubbing pads.
The last and final stage to setting this system up is placing the cover over your aquarium. This is where the plastic wrap, or Saran Wrap, is used. Starting at one end of your aquarium you should unroll enough plastic wrap to cover the entire top and still have at least six inches of extra wrap left over on each end. Stretch the plastic wrap tight over the top of your aquarium and stick the left over inches of wrap to the glass on the two ends of the tank. I’ve found it easier to accomplish this if I stick six inches or so of wrap to the glass on one end of the tank and then unroll the plastic wrap to cover the top. I then unroll the extra six inches of wrap and stick it to the glass on the other end of the tank before I cut it from the roll.
Well, if you have followed my instructions correctly, all that is left is for you to do is plug your air pump in and wait.
Now I will discuss the operation of the ultrasonic fogger. If you leave it constantly plugged in it will create too much humidity in your tank, so you should use it every now and then instead of keeping it in constant operation. I have mine set on a timer (optional – but worth the cost) that turns my fogger on for 15 minutes every two hours. If you can get a hold of, or purchase, one of these types of timers it is well worth the extra cost. If you can’t find one you will need to plug your fogger in for 15 minutes three or four times each day. I would recommend running it for 15 minutes before you go to bed, for another 15 minutes when you wake up and then for 15 minutes once or twice spaced out throughout the day. If you forget to plug it in you won’t ruin anything but your mushrooms will grow at a slower rate.
Keeping in mind that your ultrasonic fogger will make fog from the water inside the bowl it is sitting in, this fog will eventually settle into the gravel in the bottom of your aquarium. At no time do you want the water so deep in your gravel that the green scouring pads are sitting in it. What you will need to do every 4 or 5 days to correct this is to siphon some water from the bottom of your tank and pour it out. At the same time you will need to get a glass of clean tap water from your sink and pour it into the bowl to replace any water missing. To siphon water from your tank all you will need to do is stick one end of the other three-foot piece of air pump hose down into the gravel where the water is sitting and siphon it out into a glass (for disposal down the sink drain).
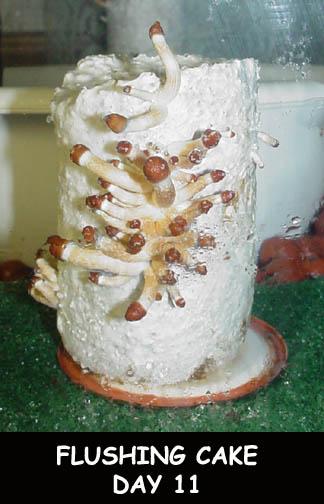
The only reasons you will need to remove the plastic wrap from the top of your aquarium will be to add and siphon out water (about once every 2 or 3 days) and to harvest your mushrooms. When you do need to remove the plastic wrap to do anything, you can just peel the plastic wrap from one of the ends of the terrarium and hold it up so you can reach in with your other hand. Then, when you’re finished you just pull the plastic tight and re-stick it to the glass on the end of the tank. To harvest your mushrooms you should first wait until the cap of the mushroom is at least half opened and the edges of the caps have pulled away from the veil. Gently grasp the base of the mushroom stem close to the mycelium cake and wiggle it back and forth a little. It should easily break away from the mycelium cake.
Sometimes you will have clusters of mushrooms all growing out of the same spot on the mycelium cake. If they are all ready to be harvested you can just grasp the whole cluster and wiggle them until they break away from the mycelium cake. If some mushrooms in the cluster are ready for harvest, and others are still not ready, you should take a clean pair of scissors and clip the stems of the matures ones close to the cluster without disturbing the ones that are not ready for harvest.
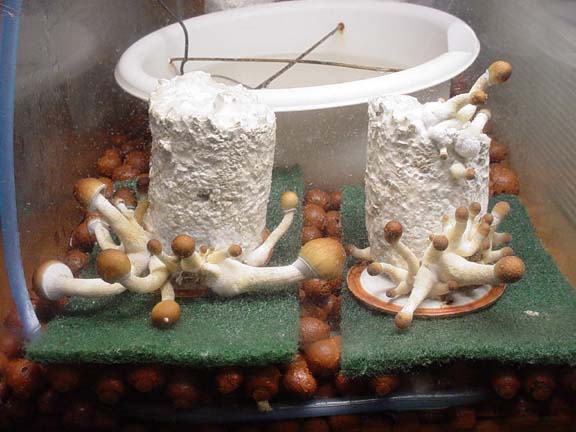
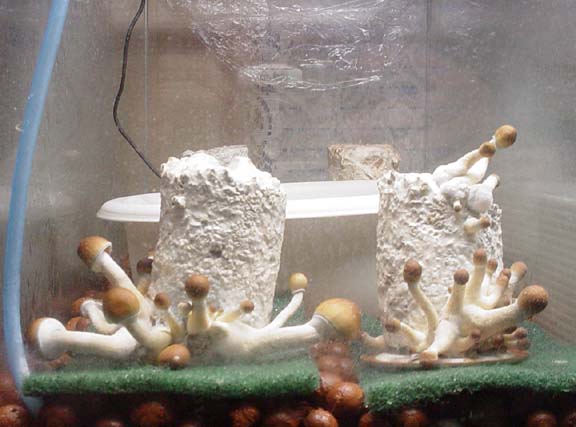
* You can place one, two three or four mycelium cakes into this type of terrarium setup at a time. It is not mandatory for you to have all four mycelium cakes ready to begin this method (see pictures below).
ADVANCE to Chapter 8: WORTHY TECHNIQUE NOTES

|